Henbury Installation Instructions
PLEASE READ THESE INSTRUCTIONS CAREFULLY AND KEEP IN A SAFE PLACE FOR FUTURE REFERENCE.
This guide contains general installation instructions on how to install your product. However, it is important that the item is installed by a qualified and experienced professional. Therefore reliance on these instructions will be minimal.
Care taken during the installation will ensure long life and trouble free operations from the Henbury bridge mixer tap.
It is extremely important that all pipe work is flushed thoroughly after installation to avoid damaging the ceramic discs. It is recommended that the both hot and cold valves/handles on the tap are opened fully before you turn the water supply back on. This will ensure no debris will get lodged in the disc, causing possible damage.
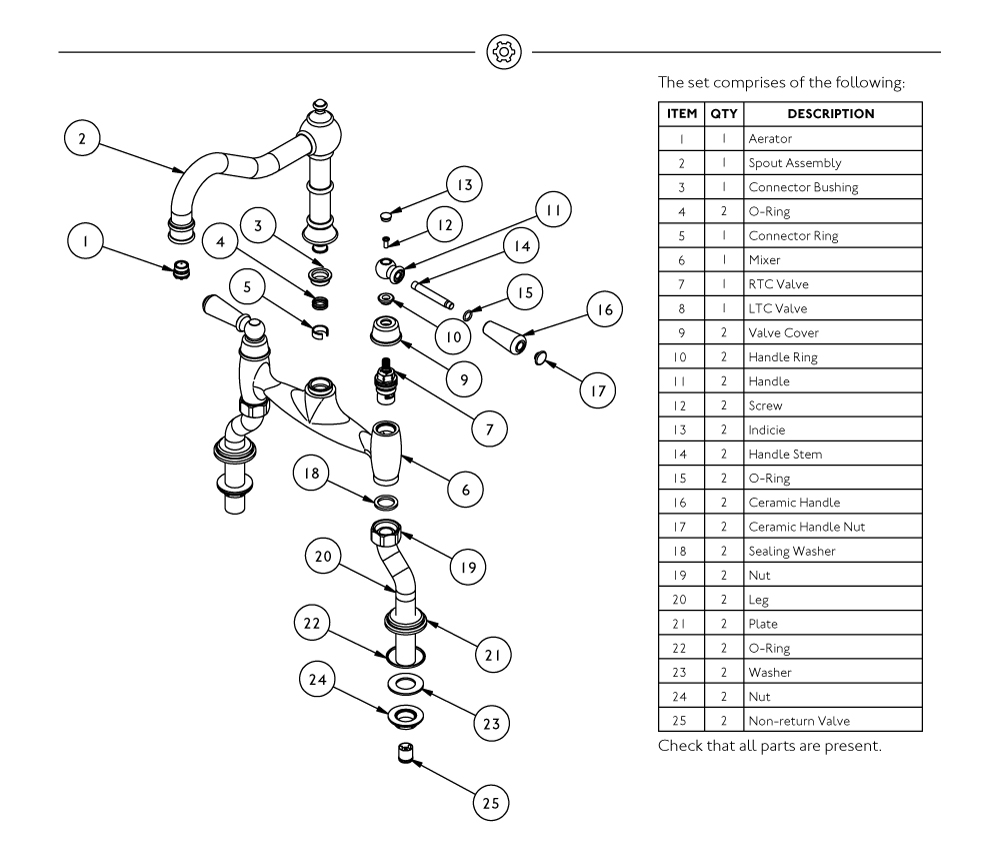
SPARE PARTS LIST
Ideally you will have isolating valves already fitted to your supply pipework. If so close both the hot and cold isolation valves and open the tap levers to release any trapped water/pressure. You can now disconnect the old tap. If you do not have isolating valves fitted to the existing tap, you will then need to shut off the main water supply by following the next step.
First shut off any stop cock on your hot water system then, with your mains cold water stop cock also closed, open the lowest hot and cold taps in the house and allow to run until both hot and cold pipes are empty (the hot water storage cylinder always remains full but cannot empty due to being shut off).
Fitting isolating valves to the inlet feeds is recommended for ease of maintenance.
REMEMBER TO TURN OFF THE MAINS WATER SUPPLY BEFORE CONNECTING TO ANY EXISTING PIPE WORK.
- Identify all components before fitting;
- Flexible tailpipes should NOT be over tightened as this can cause damage to the rubber seals
- Use the rubber seal and horseshoe plate provided to install the mono basin mixer into the basin as shown
- Connect both hot and cold water supplies and any non-return valves supplied
- To check for joint and connection leaks, turn on the water supplies and open both taps letting the water flow for a few minutes;
- Resolve if required.
- ENSURE YOU HAVE THE CORRECT PRESSURE BEFORE FITTING:
- Recommended operating pressure 1.0 Bar
- Maximum operating pressure 3.0 Bar
REGULAR DAILY CLEANING
The surface finish we use on our taps is very durable and hardwearing. However, care should still be taken when cleaning them. They should be cleaned only with warm soapy water followed by rinsing with clean water and drying with a soft cloth. All finishes are vulnerable to astrong cleaning agents and therefore substances such as household cleaners, disinfectants, denture cleaners, hair dyes can cause damage to the surface and should be avoided.
For more detailed information on taking care of your Bidbury tap, click here